Reset Unread Mail Count on Login Screen

On the Windows XP login screen you can easily see how many unread mail you still have in your inbox. This number can be wrong sometimes. This could happen for all sorts of reasons but the most common I come across is that someone else uses MSN Messenger on my machine. The number of his/her unread e-mails then gets added to my unread mail. When you click on the unread mail count on the login screen you can see how many unread mails each logged account has. While resetting the unread mail count is easy (with the TweakUI Windows XP PowerToy) you might want to prevent it from ever happening again.

Reset Mail Count

Like I mentioned before you can easily reset the mail count on the login screen with the TweakUI Windows XP PowerToy. You can download it from the Windows XP PowerToy website or directly by clicking here.

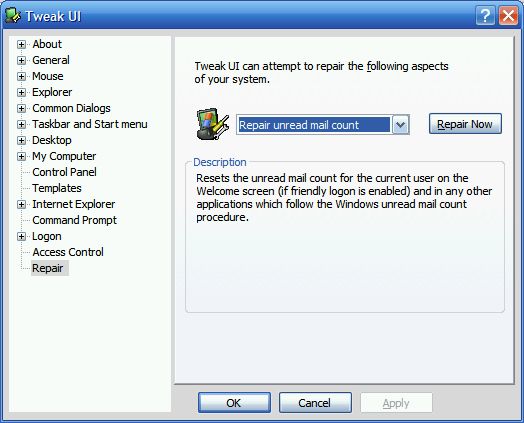
Once installed open it and choose the Repair section on the left. On the right use the dropdown list to select “Repair unread mail count” and choose Repair Now.

Tweak UI Unread Mail Count
Resetting the Unread Mail Count with TweakUI

Prevent it from happening again!

Like shown resetting is easy but having to do this every single time someone else has used my computer to use MSN Messenger really got annoying. By setting registry permissions you can overcome this and allow only the accounts you specify to update the unread mail count.

  1. Use TweakUI to reset the current Unread Mail count
  2. Open Outlook with the account you want the Unread Mail count to apply to.
    If you’ve got several Outlook profiles and also want to have the Unread Mail count apply to those accounts restart Outlook with those profiles.
    If you’ve got a Hotmail account and also want to have the Unread Mail count apply to that account login to MSN Messenger.
  3. Open the registry and browse to;
    HKEY_CURRENT_USER\Software\Microsoft\Windows\CurrentVersion\UnreadMail
  4. Expand the key; you should now see ‘folders’ of the e-mail accounts that you want to have the Unread Mail count apply to.
    If there is an account listed that you don’t want to have the Unread Mail count apply to you can remove the ‘folder’ by selecting it and then press DELETE
  5. Right click on the the UnreadMail ‘folder’ and choose Permissions…
  6. Press the button Advanced
  7. Deselect the checkbox for “Inherit from parent the permission entries that apply to child object. Include these with entries explicitly defined here.”
  8. When prompted choose Copy
  9. From the Permission entries box select your username and press the button Edit…
  10. Deselect Create Subkey-> OK
  11. If you are a member of the Administrators group also deselect the Create Subkey permission for that group
  12. OK yourself a way out of all the open screens and close the Registry Editor

The login screen will now only display the (combined) Unread Mail count from the accounts specified. If you want to add an additional account later enable the Create Subkey permission again, start Outlook/MSN Messenger with the account and then deselect the permission again. You can always delete the UnreadMail ‘folder’ to restore things to the way they were.

Get rid of it completely

Another (bit more drastic) method is to get rid of the Unread Mail count completely. This is also something you can do with the TweakUI powertoy. From the left pane expand Logon and then Unread Mail. Deselect the option “Show unread mail on Welcome screen.” You can choose whether to apply this only to your account or for all users on that computer.


ABF Outlook Backup
Use "ABF-1HTJ8" to get a discount when ordering!

Interface Not Registered

When using Word as your e-mail editor you might encounter the error “Interface Not Registered” when trying to send your e-mail. As a result you are unable to send it but you are able to send e-mail when setting Outlook as your e-mail editor. To solve this so you are able to use Word as your e-mail editor close all running Office applications. Then use Start-> Run and type;

Regsvr32.exe %Windir%\System32\Ole32.dll

This will correctly register the ole32.dll file in the registry.


Duplicate E-mails

It’s probably one of the most annoying things; receiving the same e-mail multiple times. Actually I’m not talking about a single e-mail but basically all your e-mails and not just twice bot LOTS of times. This article discusses the most common configurations which lead to e-mail duplication and how to prevent them from happening again.

Rules

Rules and more specific “Move to folder” rules is the most easiest one to get yourself some duplicates. This is because for each e-mail received Outlook will fire all configured rules against it. The following example will show this can lead to duplicates.

In this example there are two rules configured;

  1. Apply this rule after the message arrives
    from Robert Sparnaaij
    move it to the Outlook folder
  2. Apply this rule after the message arrives
    with Outlook in the subject
    move it to the Outlook folder

Now imagine that you receive an e-mail from me where I have the word Outlook in the subject; both rules with apply! So it will get moved two times creating a duplicate. The way to prevent this is to add the action “stop processing more rules” to the rule. If we would add that action to the first rule and the rule applies the action “stop processing more rules” will prevent that the second rule will be executed. Keep in mind that if you have even more rules configured that should always trigger -for instance that assigns messages to a category or marks it for follow up- you’ll need to sort your rules in the correct order as well.

Multiple Accounts

When you configure multiple accounts in Outlook make sure that these are indeed separate accounts and not just aliases on the same mailbox. In the case of an alias you would basically have the same account configured twice as all mails from either alias is being received in the same mailbox. When you also have the option configured to leave a copy on the server (POP3 account) both accounts will collect the same e-mail leaving you with duplicates. To read up on the difference between a separate mailbox and aliases click here.

To prevent duplicates you must configure the alias account not to receive e-mails since they are already being received by the original account;
Tools-> Options-> tab Mail Setup-> button Send/Receive-> button Edit…-> select the alias account-> uncheck Receive mail items

Profile Recreation

When you recreate your mail profile -for instance when the original got corrupted or when you reinstalled your PC and configure Outlook for the first time again- and you originally had Outlook configured to leave a copy on the server (POP3 account) it will collect all the e-mails from the server again even when you have received them in a previous configuration. This is because the newly created profile doesn’t “know” that these messages have been received before by another profile. So this means that when you recreate your mail profile and during setup you immediately configure it to use your old pst-file as the default delivery location it will create duplicates for the messages that are already received and that are still on-line as well. To prevent this from happening make sure start Outlook at least once with a clean pst-file before reconnecting the old one and setting it as the default delivery location. This way you’ll collect all the e-mails in a new pst-file.

For Outlook 2002/XP and 2003

  1. Connect to your original pst-file by File-> Open-> Outlook Data File… and once opened move all the newly received e-mails to that pst-file.
  2. Close Outlook and go to Control Panel-> Mail-> button Data Files…-> button E-mail Accounts-> button Next-> at the bottom you can select the original pst-file as the default delivery location and press Finish.
  3. Press the button Data Files… and remove the other pst-file. If you want to keep your computer clean press the Settings button first and write down the location of the pst-file so you can physically delete the file as well and not just the connection to it.

For Outlook 2007

  1. Connect to your original pst-file by File-> Open-> Outlook Data File… and once opened move all the newly received e-mails to that pst-file.
  2. Close Outlook and go to Control Panel-> Mail-> E-mail Accounts-> tab Data Files. Select the the original pst-file and press Set as Default
  3. Select the other pst-file and press Remove. If you want to keep your computer clean press the Settings button first and write down the location of the pst-file so you can physically delete the file as well and not just the connection to it.

Synchronization Tools

Synchronization Tools are great for instance to keep your contacts you have in Outlook and on your mobile device like PDA and mobile phone synchronized and up-to-date. Depending on the tool you are using synchronizing for the first time might be tricky and could cause some duplicates or “similar” items. For instance I used to store most of my mobile phone contacts by first name only and the ones in Outlook by their full name. So I had a contact named Edwin on my mobile phone and a contact named Edwin Sparnaaij (yep, trying to get my brother famous here :-D) in Outlook. When I would synchronize I would end up with an item named Edwin and an item named Edwin Sparnaaij in both Outlook and my mobile phone since the synch tool doesn’t know these are one and the same persons in real life.

To prevent this from happening make sure your contacts are in order before synchronizing for the first time or you’ll only duplicate the mess. Since my mobile phone was a big mess mainly because of the lack of a proper input device and contact storage properties on it (I had a Nokia 3210 at that time) getting things in order would be handier in Outlook. To make sure it doesn’t mix with your original Outlook contacts you can create a new mail profile first with a dummy account or no account configured at all (tip: call the profile Mobile Device so you can easily recognize it). Now you can safely synchronize with that mail profile and use Outlook to easily clean up your contacts on your mobile.

If you are a control freak (I won’t be last to admit this) and want to make sure that the initial synchronization indeed doesn’t create any duplicates move the cleaned up contacts from the Mobile Device mail profile to your original one.
Start Outlook with your original mail profile
Connect to the pst-file from the Mobile Device profile by File-> Open-> Outlook Data File…
Move the Contacts from the Mobile Device pst-file to your original Contacts folder

Now that you have created a “master copy” in Outlook make a back-up of your pst-file in case synchronization goes wrong after all. Also now that we have all contacts correctly in Outlook we don’t want it to still end up creating duplicates because the synchronization tool isn’t “intelligent” enough to recognize the similar items (this depends on the synchronization tool you are using so I’m going for a fail safe here). As we have a master copy in Outlook we can safely delete all the contacts on the mobile device. Now reconfigure your synchronization tool to use your original mail profile and synchronize; there is just NO WAY you can end up with duplicates now! ;-)

Virus scanner / Firewall

Another quite common evil which will end up creating duplicates are virus scanner that integrate with Outlook or too strictly configured firewall. To understand this I’ll explain a little bit how the e-mails are actually being received without a virus scanner or firewall;

When Outlook does a Send/Receive it will make a connection with the mail server and will ask the server which e-mails it is currently storing. The mail server will respond with a list and Outlook will verify with its local list if it has collected all the e-mails already. If so; Outlook will close the connection to the mail server. If not; Outlook will request the new e-mails from the server and when it has received all the e-mails it will close the connection with the mail server and update its own list of received e-mails.

The above illustrates a perfect Send/Receive cycle. If for some reason the connection gets terminated unexpectedly so that Outlook cannot close the connection to the mail server properly Outlook will consider it as a failed Send/Receive cycle and will not update its own list of received e-mails even when some or all of them have been received already. This means that at the next Send/Receive interval Outlook will check for new e-mails with an “outdated” list and collects the e-mails from the previous Send/Receive interval again and will not update its local list until the connection to the mail server closes properly.

This is where the virus scanner and firewall come into the picture. The exact method depends a bit on the virus scan solution chosen but basically when a virus scanner integrates with Outlook it will “intercept” the Send/Receive request from Outlook. So when Outlook does a Send/Receive and “thinks” it is talking to a mail server it is in fact talking to the virus scanner. This means that now the virus scanner is responsible for the connection. This means setting up the connection, requesting the list of mails stored on the server, managing the timeouts, etc… but also closing the connection properly and telling this to Outlook. Although this could go right of course many many times, keep in mind that you do have added a single point of failure to the Send/Receive process leaving you with another possibility that the connection to the mail server isn’t closed properly and already received e-mail being received again at the next Send/Receive interval.

Therefore it is another good reason to prevent your virus scan solution to integrate with Outlook. There is no direct need to integrate a virus scanner with Outlook as it is redundant anyway; it won’t add another level of security since it is one and the same tool as your on-access-scanner. Default Outlook security settings and an up-to-date virus scanner are enough to keep you safe! see the documentation of your virus scanner on how to disable its integration with Outlook.

Now that you know how the Send/Receive interval works you can imagine that a too strictly configured firewall could terminate the connection prematurely so Outlook will never have the chance to update its local list of received e-mails. In this case check disable your firewall and wait two Send/Receive intervals. If the second one doesn’t cause any duplicates you’ll know that your firewall isn’t properly configured. See the documentation of your firewall software on how to configure your firewall for e-mail retrieval with Outlook.

Tools to clean up the mess

If you are just swamped with duplicates you probably don’t want to clean up the mess manually. The ideal and easiest way to recover would be by restoring a back-up. If you don’t have a current back-up there is a wide range of duplicate remover tools to choose from.

SperrySoftware (discount code “BH93RF24”)
Duplicate Appointments Eliminator
Duplicate Contacts Eliminator
Duplicate Email Eliminator Across Folders
Duplicate Journals Eliminator
Duplicate Notes Eliminator
Duplicate Posts Eliminator
Duplicate Tasks Eliminator
Eliminator Bundle

MAPILab (discount code “4PM76A8”)
Duplicate Email Remover
Duplicates Remover

Reading Pane not available in Drafts folder

For some strange reason there the Reading Pane is not available for the Drafts folder in Outlook 2003. If you really need to have a Reading Pane in the Drafts folder you can create a Search Folder to workaround the issue.

Create a Search Folder for the Drafts folder

  1. File-> New-> Search Folder
  2. Select “Create a custom Search Folder” which is at the bottom of the list
  3. Press “Choose”
  4. Give the folder a name e.g. “Drafts”
  5. Press “Browse…”
  6. Deselect the root folder and make sure only the “Drafts” folder is selected
  7. Press OK to return to the “Custom Search Folder” dialog
  8. Press OK and press Yes again to close the notification

You now have created a Draft folder for which you can enable the Reading Pane!


Create a BCC rule

You can create a rule to automatically CC someone when sending a message. Unfortunately an automatic BCC is not possible although often preferred over a CC.
Fortunately programmatically it is possible although not supported by Microsoft. For more info;
http://www.outlookcode.com/d/code/autobcc.htm

If you are not comfortable doing this manually by code you can also use a supported add-in from SperrySoftware called Always BCC
If you decide to order use “BH93RF24” to get a discount


CRC (Cyclic Redundancy Check) errors on pst-file

CRC (Cyclic Redundancy Check) errors are indicating errors with a specific file and in lot of cases with your hard disk. It doesn't indicate a problem with Outlook itself but a problem with the place on the hard disk where your pst-file is located. When this occurs after you have just copied the pst-file (on disk, from network, from CD, by download) you should first verify that the original source still works and try to copy it again. If this has happened "all of a sudden" like in that it still worked yesterday, the issue can be either software based or hardware based. Continue reading: CRC (Cyclic Redundancy Check) errors on pst-file


Cannot Delete Message

There are three easy steps you can take to solve this for most situations. Please click here if you message is stuck in the Outbox.

Method 1

Clear the Deleted Items folder and try to delete the message again.

Method 2

Edit the message;

  1. Open the message by double clicking on it
  2. Choose Edit-> Edit message
  3. Type or remove some characters (I usually type 3 spaces)
  4. Save and close the message
  5. Try to delete the message again

Method 3

Run scanpst.exe against your Personal Storage (pst-) file. By default the scanpst.exe tool is located in;
C:\Program Files\Common Files\System\MSMAPI\<local ID>

To locate your pst-file;

  • Make sure you include hidden and system files and folders when searching for pst-file
  • By default it is located in
    C:\Documents and Settings\%username%\Local Settings\Application Data\Microsoft\Outlook\
  • You can also locate the file by using
    Rightclick the root folder (probably Outlook Today)-> Properties-> button Advanced-> field Filename

Contacts are not available in the Address Book

When trying to use the Address Book to address a message to a contact you could find that the contact from your Contact folder aren’t listed. Here are the two things you’ll need to check and set correctly.

Make sure the Outlook Address Book service is added to the profile

To do this go to Tools-> E-mail Accounts-> option View or change existing directories or address books-> button Next
If the Outlook Address Book service is added already continue at next step
If the Outlook Address Book is not added;>

  1. click the Add… button
  2. select Additional Address Books and click Next
  3. choose Outlook Address Book and click Next
  4. You’ll be prompted that you must close and restart Outlook for changes to take effect
  5. Press OK and close and restart Outlook
  6. The service is now added

Make sure that the Contacts folder is marked as an Outlook Address Book

If the Outlook Address Book service is added into the profile you can make any Contacts folder (so even the addtitional ones you may have made yourself already) show in the Address Book. To do so rightclick the Contacts folder and choose Properties-> tab Outlook Address Book-> select option Show this folder as an e-mail Address Book.

You should now be able to select Contacts by using the Address Book.

Exception

When the Outlook Address Book service has already been added and the option to select the Contacts folder as an Outlook Address Book is still greyed out, it means that the Outlook Address Book service is corrupted. To fix this you can remove the Outlook Address Book service, restart Outlook, and then add it again as indicated by the steps above. Sadly this workaround will not work in Outlook 2007 as removing the Outlook Address Book service is not supported in Outlook 2007. In this case you must recreate your mail profile.


Creating a Classic View in Outlook 2003

Since a lot of people are “hooked” on the classic view of Outlook or simply don’t like the initial Outlook 2003 view I made an overview of settings to change so it looks more like previous versions of Outlook.

Change the Messages view

The Messages view is the default view for all Mail Folders. When we change this view all Mail Folders who are still in this default Messages view will change as well.

To change the Messages view go to;
View-> Arrange By-> Current View-> Define Views…-> select Messages-> button Modify-> button Other Settings…

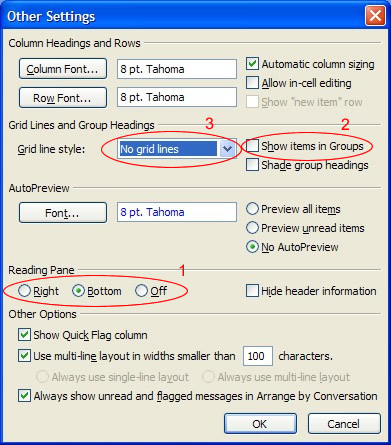
There are 3 changes we’re going to make to this default view;

  1. Change the location of the Reading Pane to Bottom
  2. Ungroup the items
  3. Remove lines between messages

View Other Settings Although the method isn’t fail proof and it won’t change the view of the folder who are in a modified view already this will still save you a lot of time adjusting the folders. For the folders which didn’t change after you modified the Messages view there is no other way than to repeat the steps described above in that specific folder.
Drag down the Navigation Pane

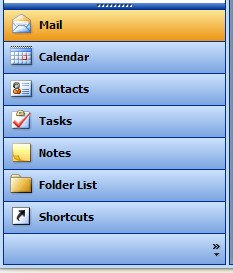
This one is easy; go to the top of the Navigation Pane hold down the mouse and then drag it down

Starting Outlook in the Folder List or Shortcuts Navigation

By default Outlook starts in the Mail Navigation. This navigation only displays the Mail folders. The Folder List Navigation shows all folders that exist in the mailbox in a hierarchy. The Shortcuts Navigation can be compared to what the Outlook Bar was; here you can configure all your own shortcuts to other Outlook folders, Explorer folders or even files*
Outlook remembers in what Navigation you closed but you can also change this in the registry. This can be handy if you are an administrator and want to deploy Outlook in the Folder List or Shortcuts Navigation so you can give your users a “Classic” Navigation.

To change the start-up Navigation we must change/create a registry key.;

  1. Make sure Outlook is closed.
  2. Open your registry editor by opening the Run command and type regedit (regedt32 for Windows 2000)
  3. Locate the following key
    [HKEY_CURRENT_USER\Software\Microsoft\Office\11.0\Outlook\Options]
  4. Expand the Options key and select the “WunderBar” key.
    If it doesn’t exist yet choose  Edit-> New-> Key and name it WunderBar (case sensitive!).
  5. In WunderBar select “BootModule”
    If it doesn’t exist yet choose  Edit-> New-> DWORD value and name it BootModule (case sensitive!).
  6. Double-click on the newly created value and give it the number matching the Navigation you want to start Outlook with;
    0: Mail Navigation
    5: Folder List Navigation
    6: Shortcuts Navigation; note that you must have a shortcut present to the Inbox in order for this to work
  7. Press OK on the input box and close the registry editor
  8. When you open Outlook the Outlook will start in the configured Navigation.

Not comfortable editing the registry manually? Download the reg-files here. Double-click one to import them into the registry and change the Navigation.

*When you drag & drop files or folders from Explorer into the Shortcuts Navigation a shortcut will be created automatically


Unblock Attachments

Believe it or not but some people are actually creating and sending messages with attachments that will do your computer no good. Yes, you are correct; VIRUSES! There are a lot of file types in which a virus can reside. The most known are executables (programs) and scripts (automated processes). A filename consists out of 2 parts; a name and an extension. The extension is the part of the filename after the dot. For instance the filename document.doc. Document is the name part and doc is the extension part. The last part decides how the file opens. In our example a doc file will open with Microsoft Word. Continue reading: Unblock Attachments