
The Personal Folders Backup add-in creates backup copies of your .PST files at regular intervals making it easy to keep all of your Outlook folders safely backed up. Although the download site states that it works for Outlook 2002 or later, it actually still works for Outlook 2000 as well. Continue reading: Microsoft Outlook Backup Add-in not available

Use "PFHTO781" to get a discount when ordering!
AutoArchive not Working
AutoArchive and Archive are options in Outlook to automatically or manually initiate moving of Outlook items to an Outlook Data File based on previously made settings. Default AutoArchive settings can be made by going to Tools-> Options-> tab Other-> button AutoArchive… You can change this default set for every folder by right clicking a folder-> Properties-> tab AutoArchive. A manual Archive can be initiated by going to File-> Archive…
In some cases you’ll notice that AutoArchive or Archive is not working as expected even when all settings appear to be correct. Use the steps below to troubleshoot and get AutoArchive and Archive working again. The terms AutoArchive and Archive are being used interchangeable.
Excluded from AutoArchive
A specific item will not be archived when the property is set to exclude it from AutoArchive. You can find this option by opening this item and then choose File-> Properties-> option Do not AutoArchive this item.
Modified Date
Archiving works based on the modified date of an item. The modified date of an item can be viewed by opening the item and then choose File-> Properties. The item will only be archived when the modified date of the item is older than the date set for archiving. Actions that can cause the modified date to change are;
- reply
- reply to all
- forward
- move to another folder
- editing
- saving
- importing
In some cases (depending on the tools being used) scanning the item by for instance a virus scanner, anti-spam filter or synchronization software can also cause the modified date to be changed.
Damaged archive.pst
When the archive.pst file (or whatever the name of the pst-file is you archive to) has become corrupted it will not be possible for Outlook to archive to that file. You should then close Outlook and use the Inbox Repair Tool (scanpst.exe) to scan it for errors or create a new one. The location of scanpst.exe depends on the version of Outlook that you are using. You can find an overview of where scanpst.exe is located for your version here.
Full Archive.pst
When the archive.pst file (or whatever the name of the pst-file is you archive to) is full Outlook won’t be able to store more items in it. For Outlook 97-2002 pst-files (ANSI) this limit is reached when the file has become around 2GB. You’ll then need to use this tool to repair it so you can access it again in Outlook. You can then either clean it up by deleting items or create a new archive file (recommended).
For Outlook 2003-2007 pst-files (UNICODE) the default limit is 20GB. When it’s an archive file you won’t be able to move items to this pst-file (either manually or by using AutoArchive) when the file reaches 19GB. When this size it’s reached you are still able to access the file to clean it up but it’s recommended to create a new archive file.
If you are not sure whether your pst-file is in UNICODE or ANSI mode, please see these instructions to find out.
Full Mailbox
It’s quite likely that you won’t bother about archiving your mailbox until your mailbox has reached the maximum size set by your mail administrator. When trying to send a message when your mailbox is full you’ll actually receive an error stating that your mailbox is full. However when you try to archive when your mailbox is full, Archive will not work and you won’t receive an error stating that either. To get Archive to work again you can either delete or move some items to your archive file by hand or contact your mail administrator to increase the size of your mailbox. For cleanup tips click here.
About mailboxes, addresses and aliases
Normally a mailbox only has one e-mail address. Several e-mail providers allow you to set multiple addresses on just one mailbox. This document describes the effects of aliases on Outlook.
- So what are aliases?
- Why would I need an alias?
- Now that the messages are send to different address what’s in it for me?
- Can I change my default alias I send with?
- I want to send a mail but I don’t want to use my default address to send with
So what are aliases?
Aliases are nothing more than different ways to mail to a certain mailbox. Just like a single person can be reached on more than one phone number a single mailbox can be reached with different mail address. In most cases your ISP will give you one mailbox with one address they choose for you (in most cases it will be an abbreviation of the name you are registered with for their services or your username). They probably will also give you the opportunity to add 3 or 5 address you choose to the mailbox. This can be any name as long it has not been reserved already.
Why would I need an alias?
An alias can be quite handy for sorting your incoming mail or just so that your e-mail address looks better to the one you give your address. Think about the following situations;
- You got one mailbox from your ISP with a default address of your username e.g. jsmith123@ISP.com
- For your friends and family to contact you you can have your full name e.g. john_smith@ISP.com
- For professional use of your address you would like to have an address that just looks better e.g. j.smith@ISP.com
Now that the messages are send to different address what’s in it for me?
The messages send to the aliases still end up in your mailbox like they were send to the original address. In Outlook you can set rules on how the emails behave (like sorting them into different folders) when send to a specific alias. Just like you can decide not to pick up your business phone after 17.00 but still answer your cell phone ![]()
Can I change my default alias I send with?
Go to your account properties and change the e-mail address to the alias you like. Yes, it is that simple!
I want to send a mail but I don’t want to use my default address to send with
You can easily overcome this problem by setting up a second account with an alias as address. Now when you want to send a message with an alias you can press the Accounts button next to the Send button to select the alias account. Make sure you configure your alias account correctly to prevent duplicates.
Another way to go is to choose View-> From Field in a new message and enter your alias you want to send with.
The first method is the most effective one as in the second method you will send the message “on behalf of” so it will look like this; (alias) on behalf of (default alias). This looks even worse if you ask me. This is because the second option normally is used in Exchange environments where people can allow others to send a name out of his/her name. Very handy for secretaries who handle the mails for his/her boss.
Change the way the Address Book sorts the names
By default names are sorted by “first name, last name”. If you want to change this to “last name, first name” do the following;
Go to Control Panel-> Mail-> E-mail Accounts-> View or change existing directories or address books-> select Outlook Address Book-> Change.
At the bottom you can set the way the names are sorted.
About the Outlook PST-File
A PST-file is the file Outlook uses to store its items in for all accounts other than an Exchange account. It also holds some configuration settings like Views, Forms, AutoArchive settings and Rules and Alerts.
The pst-file is also known as Personal Folders and Outlook Data File and is able to store several mail, contacts, journal, notes and calendar folders.
Mail folders are the Inbox, Junk E-mail, Outbox, Send Items and Drafts folders.
There is also a folder called Deleted Items. This folder holds all items (even which aren’t mail items) when they get deleted. When a folder gets deleted it will show up as a subfolder of the Deleted Items folder. Emptying the Deleted Items folder will permanently delete all the items and subfolders from the Deleted Items folder.
By default it is located in; C:\Documents and Settings\%username%\Local Settings\Application Data\Microsoft\Outlook\
For Windows Vista the default is; C:\Users\%username%\AppData\Local\Microsoft\Outlook\
You should not connect to a pst-file located on a network share as this method is not recommended by Microsoft as the chances for corruption and data loss are a lot higher than when stored locally.
When a pst-file gets corrupted you can use scanpst.exe to search for and fix errors.
The location of scanpst.exe depends on your version of Outlook.
Scanpst.exe cannot fix all type of corruptions of a pst-file. When a pst-file is too badly corrupted you can then try repairing or salvage recoverable items via a 3rd party recovery tool such as Advanced Outlook Repair (discount code DNC-PUXB-HT).
An Outlook 97 – 2002 pst-file uses the ANSI format and can become up to 2GB.
Outlook 2003 and later uses the new UNICODE format for the pst-file and can become up to 20GB and even larger by configuring its maximum size in the registry.
When deleting a lot of data at once from a pst-file, its size on the disk will not directly reflect this. Outlook will shrink the pst-file automatically when the computer is idle. To have Outlook directly return the empty space within the pst-file to your disk, you must manually compact the pst-file.
Copying a pst-file can only be done when Outlook is closed. If you close Outlook and you still cannot copy the pst-file, you might have a shutdown issue with Outlook.
You can back-up a pst-file to a CD-ROM or DVD. To read it’s contents you first need to copy it back to your hard disk and remove the "Read Only" file property as Outlook needs Read and Write access to the file. For complete backup and restore instructions click here.
Remove the Recycle Bin icon
In Windows XP all icons are removed from your desktop by default except for the Recycle Bin. When you have the Recycle Bin configured to immediately delete the items there is no need for the Recycle Bin to appear on your desktop. You can install the Windows XP TweakUI Powertool to remove it from the desktop or you can follow these instructions to do it yourself (or in previous versions of Windows).
- Logon as the user that doesn’t want the Recycle Bin anymore as it is a per user setting just like for the other desktop icons.
- Open your registry editor by opening the Run command and type
regedit - Locate the following key
[HKEY_CURRENT_USER\Software\Microsoft\Windows\CurrentVersion\Explorer\
HideDesktopIcons\NewStartPanel] - Goto Edit-> New-> DWORD value
- Name the value
{645FF040-5081-101B-9F08-00AA002F954E}(case sensitive!) - Double-click on the newly created value and type 1 and press OK.
- Close the registry editor, click on an empty place on the desktop and hit F5
The icon is gone ![]()
To turn it back on go to the key again and give it the value 0
Make Outlook Web Access Your Default Mailer
- Add the following to a .reg file (don’t forget to edit the location of the Exchange server)
Windows Registry Editor Version 5.00
 [HKEY_LOCAL_MACHINE\SOFTWARE\Clients\Mail\OWA]
 @="Outlook Web Access"
 [HKEY_LOCAL_MACHINE\SOFTWARE\Clients\Mail\OWA\shell\open\command]
@="\"C:\\Program Files\\Internet Explorer\\iexplore.exe\" http://server/exchange/alias/" - Import it into the registry by double-clicking the .reg file (Please know that mucking with the registry is potentially dangerous and can make your system unstable).
- Boot IE
- Go to IE’s Tools / Options… Programs tab
- Choose “Outlook Web Access” from the E-mail dropdown.
- Hit OK.
Source: http://weblogs.asp.net/tmeston/archive/2004/01/08/48837.aspx
Internet Explorer: Remove “Microsoft Internet Explorer” from the title bar
Ever used the Taskbar option “Group similar taskbar buttons”? It is a new feature introduced with Windows XP and it is on by default. For me it is one of the first options I disable when I configure a Windows XP client. In most cases it means extra clicking and therefore didn’t need the option.
Recently I actually enabled the option on purpose as I finally needed it to work more efficiently. During my study for SQL I had the test exam open, Books Online, several Word documents and lots and lots of Internet Explorer pages. The result; very tiny taskbar buttons and I could scroll my Taskbar for about 4 or 5 lines! Not a pretty sight so I enabled the option and the taskbar was one line again and I could actually read the buttons again.
The only annoyance I had with the Internet Explorer group is that every entry had “Microsoft Internet Explorer” behind it. When you have a list of about 18 Internet Explorer windows open all with “Microsoft Internet Explorer” behind it is hard to immediately see the right window with all the “clutter” behind it and makes the overview needlessly width. The fact that it is show is simply because it displays the name of the Title bar so we need to modify the title bar to remove the clutter.
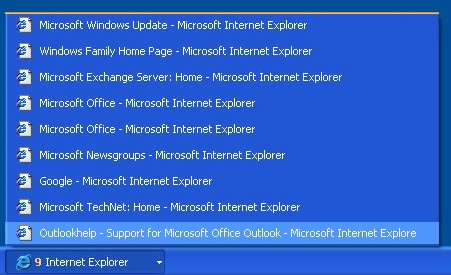
Before:
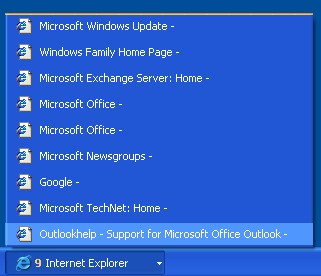
After
Fortunately removing it is pretty easy;
- Open your registry editor by opening the Run command and type regedit (regedt32 for Windows 2000)
- Locate the following key
[HKEY_CURRENT_USER\Software\Microsoft\Internet Explorer\Main] - Goto Edit-> New-> String Value
- Name the value
Window Title(case sensitive and mind the space!) - Leave the Value data empty
Now when you close all instances of Internet Explorer and start a new one “Microsoft Internet Explorer” is gone in the Title bar and all that is left is the title of the webpage with dash behind it (which can’t be removed as far as I know).
Search From the Address Bar
When you are looking for something you of course want to find it as fast as possible. For this you might already have a search tool installed like from Google or MSN. This will enable you to search the web without the need to go to the Google or MSN search page first. But there is your problem; it searches the whole web! What if you already know what site you want to look on? You can directly search a specific site from the Address Bar in Internet Explorer or in the Taskbar by editing the registry or by using the Microsoft TweakUI Powertoy
- Editing the Registry
- Search on any site directly with Google
- Using TweakUI instead of editing the registry
Editing the Registry
Enabling searching from the Address Bar requires you to edit the registry. Below you’ll find what information you’ll need to add to the registry. If you’re not comfortable editing the registry you can download this registry key which you can import or use TweakUI.
This is what’s in the key
Windows Registry Editor Version 5.00
[HKEY_CURRENT_USER\Software\Microsoft\Internet Explorer\SearchUrl]
 "provider"=""
[HKEY_CURRENT_USER\Software\Microsoft\Internet Explorer\SearchUrl\AV]
 @="http://www.altavista.com/sites/search/web?q=%s"
[HKEY_CURRENT_USER\Software\Microsoft\Internet Explorer\SearchUrl\GGL]
 @="http://www.google.com/search?q=%s"
[HKEY_CURRENT_USER\Software\Microsoft\Internet Explorer\SearchUrl\MSKB]
 @="http://support.microsoft.com/?kbid=%s"
[HKEY_CURRENT_USER\Software\Microsoft\Internet Explorer\SearchUrl\MSN]
 @="http://search.msn.com/results.asp?q=%s"
[HKEY_CURRENT_USER\Software\Microsoft\Internet Explorer\SearchUrl\TN]
 @="http://search.microsoft.com/search/results.aspx?View=en-us&p=1&s=0&c=3&st=b&qu=%s&na=30"
[HKEY_CURRENT_USER\Software\Microsoft\Internet Explorer\SearchUrl\EXT]
 @="http://filext.com/detaillist.php?extdetail=%s"
Now you can type TN Outlook in the addressbar to search for Outlook on Microsoft Technet Support & Troubleshooting
AV= www.altavista.com
GGL= www.google.com
MSKB= enter the Microsoft Knowlegde Base Article number behind MSKB to resolve the article
MSN= www.msn.com
TN= Microsoft Technet Support & Troubleshouting (main page= http://www.microsoft.com/technet/)
EXT= FILExt is a detailed database of file extensions and programs that use them (http://filext.com)
Search on any site directly with Google
You can search on a specific site by using Google by entering the following string:
http://www.google.com/search?q=site:domainname.com %s
For searching this site by the letter combination HTO (HowTo-Outlook) the registry entry would become;
[HKEY_CURRENT_USER\Software\Microsoft\Internet Explorer\SearchUrl\HTO]
 @="http://www.google.com/search?q=site:sparnaaij.net %s"
Using TweakUI instead of editing the registry
If you are not comfortable by doing this through the registry you can also use the Windows XP TweakUI Powertoy from Microsoft which you can download here. You then only have to enter the search string and the key combination you want to use.
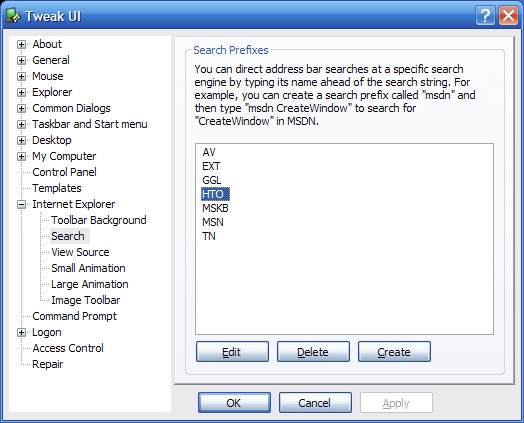
The overview of Search Prefixes displayed in TweakUI
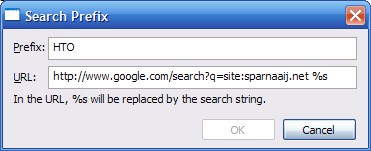
Adding a new Search Prefix with TweakUI
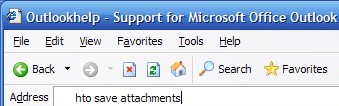
Searching information about saving attachments on the HowTo-Outlook website
Download the full Internet Explorer
This can be handy for distribution or to be added to the Windows 2000 CD
- Create a folder called C:\ie6
- Download the ie6setup.exe file to that folder (click here for a language other than English)
- Start the run dialog via Start-> Run and type this command WITH quotes!!
"C:\ie6\ie6setup.exe" /c:"ie6wzd.exe /d:1 /s:""#E" - After you accept the EULA it will provide you with options on what to download and for which platform.
Specify a folder and after the download is complete you can copy that folder to your installation CD.

Use "4PM76A8" to get a discount when ordering!
