Outlook 2003: Reverting back to /Being compatible with a previous version of Microsoft Office Outlook

There could be all sorts of reasons why you want to revert back to an older version of Microsoft Office Outlook. One could be because your demo has expired. Also there could be all sorts of reasons why you need to be compatible with older versions of Microsoft Office Outlook like when your laptop holds a previous version of Outlook while your home computer holds Microsoft Office Outlook 2003.

The new pst-file format of Outlook 2003 is not compatible with any previous version of Outlook. The Outlook 2003 pst-file format is in Unicode while the 97-2002 pst-file format is Non-Unicode. Unicode is a character set that can display almost every written language in the world. This can be very handy when sharing data in a multilingual Outlook environment. Another great feature of the Outlook 2003 Data File is that it can grow to a practically endless size. By default the file can grow to a maximum of 20GB. By using Group Policy or by modifying the registry the file can be up to 4096TB (minus 1MB but who is still counting now?) while the maximum of an Outlook 97-2002 Data File is 2GB.

When you work with Outlook 2003 and you also want your data to be available in previous versions of Outlook you’ll need to continue using Outlook 97-2002 Data Files. Follow these instructions in case you are already working with Outlook 2003 Data Files;

Step 1: Create a new Outlook 97-2002 Data File

  1. Create a new Outlook 97-2002 Data File by using File-> New-> Outlook Data File…
  2. In the New Outlook Data File prompt screen select Outlook 97-2002 Personal Folders File (.pst) and press OK
  3. Browse for the location where you want to create the new Data File and press OK
  4. If you want you can now set extra properties for the Data File and press OK
  5. The new Data File will show up in your Folder List now

Step 2: Copying the data to the Outlook 97-2002 Data File

You can do this in several ways.

Option 1

  1. Select the folder you want to copy by clicking on it and hold down the mouse button
  2. Drag & drop the folder to the Outlook 97-2002 Data File1)
  3. Repeat this for every folder you want to copy1)

Option 2

  1. Select File-> Import and Export…
  2. Choose Export to a file and press Next
  3. Choose Personal Folder File (.pst) and press Next
  4. Choose the folder you want to export. In case you want to export the complete Outlook 2003 Data File press Outlook Today select the option Include Subfolders1) and press Next
  5. Browse to the location where you saved the pst-file created in step 1 and press Finish

The newly created pst-file can now be opened in any version of Outlook.

1) Remember that the file size of an Outlook 97-2002 Data File can’t exceed 2GB. Therefore when the Outlook 2003 Data File is bigger than 2GB you’ll need to create several Outlook 97-2002 Data Files to copy your data to.


MAPILab
Use "4PM76A8" to get a discount when ordering!

Delete a stuck Read Receipt

Seeing messages being send without something in the Outbox? This could be a stuck read receipt. Before doing anything make sure you have a current backup of your mailbox (just in case)

Download MDBVU32.EXE from Microsoft. Extract the downloaded file and run mdbvu32.exe from within the extracted folder.

Press OK on the first screen
Select MDB-> Open Message Store and select your default pst-file (the one with the D in front of it) and press Open
Select MDB-> Open Root Folder

Open the default message store

You’ll find the “Read:” message in the middle pane called “Messages in Folder”

Read Receipt visible in MDBVU32.EXE

Select the “Read:” message
In the Operations available select lpMDB->AbortSubmit() (ON SELECTED MSG)
Press Call Function and then OK

Confirm to Abort the submission of the Read Receipt
Confirm to Abort the submission of the Read Receipt”

Make sure the message is still selected
In the Operations available select lpFld->DeleteMessages() (ON SELECTED MSGS)
Press Call Function and then OK

The “Messages in Folder” pane should now be empty

Read Receipt deleted through MDBVU32.EXE
Press Close

Select MDB-> Store Logoff and then OK and then OK again on the information message
Select Session-> Logoff

You can now close the open window called MDB Viewer Test Application

Open Outlook and the notice that the stuck receipt is gone.


Create your own fully customized Toolbar

Ever had the feeling that the option you need the most is just too far down all sorts of menus? Well then customizing the Toolbar is probably the solution for you. This guide will explain how you can do this by means of some examples that go more advanced. Although this is mainly targeted on Outlook note that this guide applies to practically all Office programs.

Putting your Toolbar in edit-mode

Before you can customize the Toolbar you’ll need to put your Toolbar in edit-mode. To do this press;
View-> Toolbars-> Customize…
The buttons won’t have functionality in edit-mode. If you want to test your modifications you must leave edit-mode by pressing Close.

Customize Toolbar
This window indicates that you are in edit-mode. When you close this window the buttons will regain their functionality

Adding and removing Buttons

Adding and removing buttons to existing Toolbars is the basic functionality. In this example we will remove the Find button from the Toolbar and replace it with the Advanced Find… button

Remove the Find button:

  1. Place your Toolbar in edit-mode
  2. Select the tab Commands
  3. To remove the Find icon select the icon on the Toolbar and drag it down. When the mouse pointer changes into a cross release the mouse button

Add the Advanced Find button:

  1. Make sure you are still in edit-mode
  2. Select the tab Commands
  3. In the Categories column select Tools
  4. In the Commands toolbar click on Advanced Find… and hold down the mouse button.
  5. Drag the icon to a location on the Toolbar so the pointer will loose the cross and release the mouse button to drop it in that location
  6. Press Close to leave edit mode so you can press the Advanced Find… icon and see the results

You can add any button you want to the Toolbar. Of course you can also add the Find button back in to the Toolbar.

Adding a separator

Separators are the lines you see in between some button. Their function is to create groups of buttons that hold the same basic functionality. For instance the Reply, Reply All and Forward button are placed between separators. This is because the buttons basically to the same. The Print, Move to Folder and Delete buttons are also grouped since all these buttons will perform an action on the selected messages.

To add a separator:

  1. Place your Toolbar in edit-mode
  2. Right click the icon where you want to start a group
  3. From the menu choose Begin a Group. You’ll see a separator appear.
  4. To remove the separator right click the icon again and again press Begin a Group so it will be unchecked.
  5. Press Close to leave edit-mode

Rearranging the Menu

Always wanted that option higher into the menu structure? In this example we place the Options… button under Tools higher into the menu structure;

  1. Place your Toolbar in edit-mode
  2. Select the Tools menu so it will expand
  3. Select the Options… item and hold down the mouse button
  4. Drag the button all the way up into the menu
  5. Press Close to leave edit mode

You can also place the Options item in another menu like under Edit. You can achieve this by dragging the Options… item to the Edit menu and release it there.

Modifying buttons

You can modify how the buttons will show up in the Toolbar. In this example we will change the icon, make a text button and change the ALT+KEY shortcut combination for the button.

Changing the icon:

  1. Place your Toolbar in edit-mode
  2. Right click any icon you want to change
  3. From the menu choose Change Button Image. You’ll now see a selection of icons to choose from
  4. Choose an icon to change it

Make a text button:

  1. Place your Toolbar in edit-mode
  2. Right click the Create a Rule icon. By default you’ll find it next to the Send/Receive button
  3. From the menu choose Image and Text so both the icon and the name Create Rule will show as one big button

Change the ALT+KEY combination
An ALT+Key combination is a keyboard shortcut for a specific command like ALT+N will open the New menu and ALT+R will initiate a reply on the selected message. All the letters that can be combined with the ALT key are underlined. Since now both the Send/Receive button and the Create Rule button have ALT+C as the keyboard shortcut they don’t function anymore without pressing ENTER after you make the selection. Changing the ALT+KEY combination to one that hasn’t been used yet will trigger keyboard shortcuts again.

  1. Place your Toolbar in edit-mode
  2. Right click the Create Rule button
  3. Note that the name field has a “&” sign in front of the “C”.
  4. Remove this “&” sign and type it in front of the “u” as there is no ALT+U combination yet
  5. Press Close to leave edit-mode
  6. Press ALT+U to test your keyboard shortcut

Creating a Quick Bar

All we’ve done now is editing the existing Toolbars. In this example we will create a “Quick Bar”.

  1. Place your Toolbar in edit-mode
  2. Select the Toolbars tab
  3. Press the New… button
  4. Type as Toolbar name Quick Bar
  5. Press OK. Note that you’ll now see a little empty toolbar pop-up into your screen
  6. Select the Commands tab
  7. Select File in the Categories column
  8. From the Commands column drag and drop the following items into the newly created Quick Bar
    Mail Message, Appointment, Contact, Task, Note and Office Document
  9. Press Close to leave edit mode
  10. You have now created a Toolbar which holds icons to quickly create a new message, appointment, contacts, etc… You can dock the Toolbar by dragging it to the top of your screen
Quick Bar Undocked
undocked Quick Bar
Quick Bar Docked
docked Quick Bar

Creating a Menu

You can also create your own menu with all your favourite commands.

  1. Place your Toolbar in edit-mode
  2. Select the Commands tab
  3. In the Categories column scroll all the way down to New Menu and select it
  4. In the Commands column select the New Menu and drag and drop it on a Toolbar or on the same level as File, Edit, View, etc…
  5. Right click the New Menu to change its name and to create an ALT+KEY combination for it.
  6. Drag and drop some commands into it to fill the menu.
  7. Press Close to leave edit mode and test your menu

Link to External Programs, files or web pages

Besides creating buttons to quickly access options from within Outlook you can create buttons which link to different programs or open a specific file or webpage.

  1. Place your Toolbar in edit-mode
  2. Select the Commands tab and find yourself a nice icon. What the button actually does is irrelevant as we’re going to change its functionality anyway
  3. Place the icon on a Toolbar
  4. Right click the icon and choose Assign Hyperlink-> Open…
    Assign Hyperlink
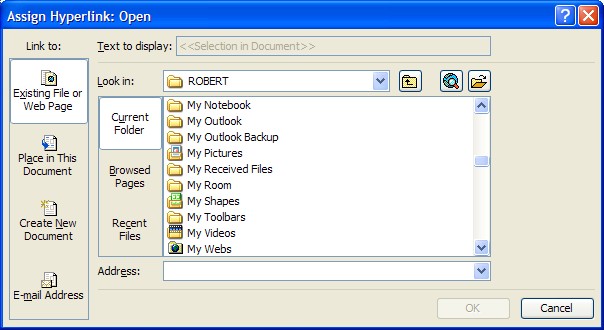
    The Assign Hyperlink dialog
  5. Browse to a document or program or type a web address like https://dev.howto-outlook.com and press OK to create a link.
  6. Press Close to leave edit mode

You can also create a link to a contact to create a button that will create a new message addressed to that contact straight away. To do this press “E-mail Address” in the “Link to” column and type the e-mail address at the top. It will automatically put “mailto:” in front of it.
Tip: create a menu named Contacts and add links in it to several contacts you mail a lot.

Assign Hyperlink Contact
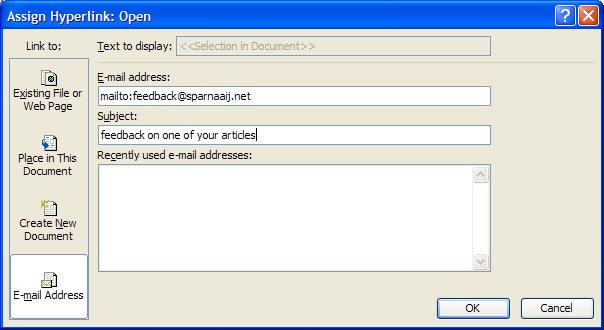
Note that you can also type a default subject

Resetting the Toolbar

After editing the Toolbar you might not like your customizations and want to reset a default Toolbar back to the way it was.

  1. Place your Toolbar in edit-mode
  2. Select the Toolbars tab
  3. Select Standard, Advanced, Menu Bar or Web
  4. Press Reset…
  5. Press Close to leave edit mode

Force a reset
You can also force a reset by renaming outcmd.dat to outcmd.old. This is quite drastic so you might only want to do this when the Toolbars don’t react the way they should and a normal reset as described above doesn’t work. When you rename the file all customizations will be gone so also all the Toolbars, buttons, hyperlinks, ALT+KEY combinations and menus you created yourself. By default the file is located in;
C:\Documents and Settings\%username%\Application Data\Microsoft\Outlook

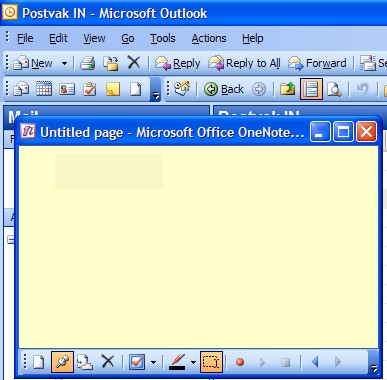
Tip OneNote: Sidenote in the Toolbar

OneNote is a program to capture, organize, and reuse notes. Although it’s mainly designed for Tablet PC’s it also holds great functionality you can use on a desktop computer. When you have OneNote you might want to have your New Note shortcut we created on the Quick Bar link to a new Side Note.

  1. Browse to the location where you installed OneNote. By default this is;
    C:\Program Files\Microsoft Office\OFFICE11\OneNote.exe
  2. Right click the file and choose Send To-> Desktop (create shortcut)
  3. Right click the shortcut you just created on your Desktop and choose Rename and rename the file to SideNote
  4. Right click the shortcut and press Properties
  5. Select the Shortcut tab and place /sidenote behind the path in the Target field.
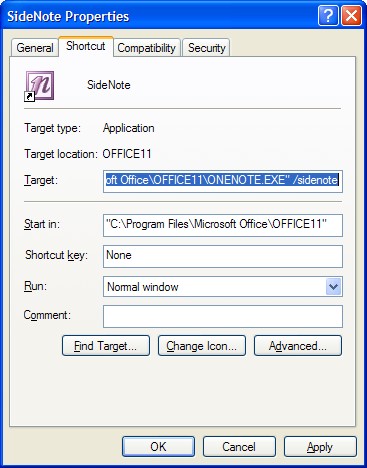
SideNote Shortcut
  6. Press OK
  7. Move the shortcut back from the Desktop to the place where you installed OneNote
  8. In Outlook place your Toolbar in edit-mode
  9. In the Quick Bar right click the New Note icon and choose Assign Hyperlink-> Open…
  10. Browse to location where you installed OneNote and select the file named SideNote we just created
  11. Press OK and then Close to leave edit-mode
    SideNote button
    Press the modified button to instantly create a new SideNote

Color Code Your E-mails Advanced

This guide handles advanced color coding settings and is good for when you’ve used color coding before. If you are new to color coding press here for the basics.

If the basic color coding options discussed in Color Code Your Email is to limited for you this guide will probably help you on your way creating color for practically every query you might think of.

Some general information about the automatic formatting.

  • You can access the Automatic Formatting in Outlook 2003 by going to View-> Arrange By-> Custom…-> button Automatic Formatting. Here you’ll also see the View Rules created by default and (if any) created in the Color Code Your Email guide.
    For previous versions of Outlook it is under View-> Current View-> Custom…
  • You can sort the rules by using the “Move Up” and “Move Down” buttons. The higher listed rules takes precedence over the lower ones
  • The formatting of the name is very tricky. Your contact name must be saved with the name that is displayed in the from field when you receive a message from him/her. Better is to create the rule based on the e-mail address. If you are in an Exchange environment you can simply add the names listed in the Global Address Book of your company
  • The Automatic Formatting only applies to the folder where the formatting is created
  • If the rule doesn’t do what you expect it to do once created you might want to try to remove or even isolate statements (by creating a separate rule for that statement) to find out where things go wrong
     
  • Do not add to much color to your mailbox or the organising effect gets lost but you’ll be left with a nice rainbow though

I’ll explain the advanced color editing by the following examples/ideas. The examples are getting more advanced each time so when you’ve practised them all you should be able to handle it as a pro because in contradiction with the basic coloring you are not limited to these examples;

Color code messages by words in the message

  1. Go to Automatic Formatting…
  2. Press the Add… button
  3. Give the rule a name
  4. Press the Condition… button
  5. In the “Search for the word(s)” field add the words Automatic Formatting should respond on
  6. By the “In” dropdown list you can specify whether to look in Subject, Subject and Body or common mail fields (like From or Category)
  7. Press OK
  8. Press the Font… button to specify how the messages that correspond to the conditions you just set are displayed. Press OK when you are done.
  9. Press OK to leave Automatic Formatting. Your rule will apply immediately to al messages already received which correspond to the rule just created

Color code messages by Category

  1. Go to Automatic Formatting…
  2. Press the Add… button
  3. Give the rule a name
  4. Press the Condition… button
  5. Press the More Choices tab
  6. Press the Categories… button
  7. Select the categories you want to Automatic Formatting to respond to. To instantly add a Category press the Master Category List… button type the name of the new category and press the Add button. When you are done selecting categories press OK.
  8. Press OK
  9. Press the Font… button to specify how the messages that correspond to the conditions you just set are displayed. Press OK when you are done.
  10. Press OK to leave Automatic Formatting. Your rule will apply immediately to al messages already received which correspond to the rule just created

Color code messages when the message is larger than 1MB and contains specific words

  1. Go to Automatic Formatting…
  2. Press the Add… button
  3. Give the rule a name
  4. Press the Condition… button
  5. In the “Search for the word(s)” field add the words Automatic Formatting should respond on
  6. By the “In” dropdown list you can specify whether to look in Subject, Subject and Body or common mail fields (like From or Category)
  7. Press the More Choices tab
  8. At the bottom in the Size frame press the down arrow where now “Doesn’t matter” is displayed and set it to “Greater than”
  9. One text area will become active now. In this window type 1024 (1024 kilobytes is 1MB)
  10. Press OK
  11. Press the Font… button to specify how the messages that correspond to the conditions you just set are displayed. Press OK when you are done.
  12. Press OK to leave Automatic Formatting. Your rule will apply immediately to al messages already received which correspond to the rule just created

Color code messages received today addressed directly to me coming from specific persons

  1. Go to Automatic Formatting…
  2. Press the Add… button
  3. Give the rule a name
  4. Press the Condition… button
  5. At the bottom next to Time press the down arrow where now “none” is displayed and set it to “received”
  6. The dropdown list next to “received” will now become active and is set to “anytime” by default. Set this to “today”
  7. In the Sent To… field type your e-mail address. If you’ve got more than one e-mail address configured in Outlook you can enter here more than one e-mailaddress. make sure you divide them with an ” ; “. Example; address1@domain1.com; address2@domain.com; address1@domain2.com. Please mind the rules about using the Sent To… button; read them here.
  8. In the From… field type the addresses of the people you want Automatic Formatting to respond to. Again; mind the rules about using the From… button
  9. Press OK
  10. Press the Font… button to specify how the messages that correspond to the conditions you just set are displayed. Press OK when you are done.
  11. Press OK to leave Automatic Formatting. Your rule will apply immediately to al messages already received which correspond to the rule just created

Color code messages that have a receipt request and is considered confidential

  1. Go to Automatic Formatting…
  2. Press the Add… button
  3. Give the rule a name
  4. Press the Condition… button
  5. Press the tab Advanced
  6. Press the Field button
  7. Navigate to and select All Mail Fields-> Receipt Requested
  8. You’ll now see “Receipt Request” in the text box under Field and next to it (under Condition) you’ll see a dropdown list set to “equals to” and next to that (under Value) you’ll see a dropdown list set to “no”. Set this value to “yes”
  9. Press the “Add to List” button. The statement is now added to the “Find items that match these criteria:” window
  10. Again press the Field button
  11. Navigate to and select Frequently-used fields-> Sensitivity
  12. You’ll now see “Sensitivity” in the text box under Field and next to it (under Condition) you’ll see a dropdown list set to “equals to” and next to that (under Value) you’ll see a dropdown list set to “normal”. Set this value to “confidential”
  13. Press the “Add to List” button. The statement is now added to the “Find items that match these criteria:” window so you’ll now see both statements just created.
  14. Press OK
  15. Press the Font… button to specify how the messages that correspond to the conditions you just set are displayed. Press OK when you are done.
  16. Press OK to leave Automatic Formatting. Your rule will apply immediately to al messages already received which correspond to the rule just created

Color code a meeting request where you have not yet responded to

  1. Go to Automatic Formatting…
  2. Press the Add… button
  3. Give the rule a name
  4. Press the Condition… button
  5. Press the tab Advanced
  6. Press the Field button
  7. Navigate to and select Appointment-> Meeting Status
  8. You’ll now see “Meeting Status” in the text box under Field and next to it (under Condition) you’ll see a dropdown list set to “equals to” and next to that (under Value) you’ll see a dropdown list set to “Meeting organizer”. Set this value to “not yet responded”
  9. Press the “Add to List” button. The statement is now added to the “Find items that match these criteria:” window
  10. Press OK
  11. Press the Font… button to specify how the messages that correspond to the conditions you just set are displayed. Press OK when you are done.
  12. Press OK to leave Automatic Formatting. Your rule will apply immediately to al messages already received which correspond to the rule just created

Well that should be it! You are now able to create rules with combined types of conditions. Again; If the rule doesn’t do what you expect it to do once created you might want to try to remove or even isolate statements (by creating a separate rule for that statement) to find out where things go wrong.


Color Code Your E-mails

This guide only handles color coding basics and is good for when you’re new to color coding. For an advanced guide press here.

Directing mails to different folders to sort or distinguish them is probably one of the most used way of organizing mail. There is a different one however; color code them!

Color coding has a few advantages I think over moving them to separate folders. One of them is that you don’t get lost in all sorts of mail folders. Also sometimes a folder doesn’t make sense as you just want to strike some messages when they are

To color code your mail coming from someone specific:

  1. Select the mail coming from someone you want to select a color for
  2. Press Tools-> Organize. A pane will scroll down now
  3. On the left side of that pane choose “Using Colors” The name of the sender will now be visible in the above rule
  4. Choose the option “From”. You’ll see the name field automatically adjusting when you select a message from someone else
  5. Choose a color from the dropdown list and press “Apply Color”.

To color code your mail sent to someone specific or to a specific e-amil address that you own:

  1. Select the mail sent to someone you want to select a color for
  2. Press Tools-> Organize. A pane will scroll down now
  3. On the left side of that pane choose “Using Colors” The name of the sender will now be visible in the above rule
  4. Choose the option “Sent to”. You’ll see the name field automatically adjusting to reflect the “Sent To” property of the selected mail
  5. You can change the name field if it doesn’t reflect the right address or contact name
  6. Choose a color from the dropdown list and press “Apply Color”.

To color code your mail sent only to you:

  1. Press Tools-> Organize. A pane will scroll down now
  2. On the left side of that pane choose “Using Colors”
  3. In the rule “Show messages sent only to me in” select a color from the dropdown list and press the Turn On button.
    Note that the rule only applies to messages sent to your default e-mail address

Undo a color setting:

Follow all steps and in the last step choose “Auto” as the color or in the case of the “sent only to you” rule click the button Turn Off.


Clear the Most Recently Used lists

For certain actions, Outlook holds a list of most recently used items (MRU lists) so you have quicker access to them. In some case you want to clear this MRU list.

Outlook holds two different kind of MRU lists. Some are tied to the general Outlook configuration of the logged in user and others are tied to the specific mail profile Outlook has been started with. To clear either MRU list, them you can simply delete the corresponding registry key when Outlook is closed. If you are not comfortable editing the registry yourself you can use OutlookTools instead.

Continue reading: Clear the Most Recently Used lists


Tips For Cleaning Up Your Mailbox

Are you reaching the limit of your mailbox storage quota or simply want to get rid of some clutter in your mailbox but don't know where to start? This is the guide for you!

While there is no single "holy grail" method in storing your emails, the strategy used for cleaning up your mailbox effectively are much more generic and can be used for pretty any storage method you use.

In addition to having that "cleaned up" feeling, there are also technical benefits to having a tidy mailbox such as faster loading of Outlook, less clutter in your Search results and quicker backup ups since the mailbox to backup is now smaller. .


Enabling/Disabling Cached Exchange Mode through the Registry

Cached Exchange Mode is new in Outlook 2003. If makes a local copy of the Exchange Mailbox. The benefits of enabling this is reducing network traffic, faster responds time of the Outlook client (especially with large attachments), being able to use the Junk E-mail Filter and being able to work off-line.

When you create a new profile in Outlook 2003 Cached Exchange mode is enabled by default.
When you upgrade from a previous Outlook version with an Exchange mailbox to Outlook 2003 Cached Exchange mode is disabled by default.

This makes it really hard to determine and control remotely whether your clients have Cached Exchange Mode enabled.

Enabling/Disabling Cached Exchange Mode can be controlled though the registry. This allows you to enable/disable it with a simple logon script to create a standard in your organization without the need of forcing the recreation of the entire profile at start-up or visit each client.

Cached Exchange Mode is controlled by the following key;
[HKCU\Software\Microsoft\Windows NT\CurrentVersion\Windows Messaging Subsystem\Profiles\<ProfileName>\13dbb0c8aa05101a9bb000aa002fc45a]

00036601     (REG_BINARY)

enabled value;  84 01 00 00
enabled with Public Folders/Favorites: 84 05 00 00
disabled value; 04 00 00 00

Please note that the “00036601” registry key stores more connection settings that just wether or not Cached Exchange Mode is enabled. The values above are taken from a new mail profile with only the Cached Exchange Mode setting changed. If you’re going to deploy this registry key I recommend taking the value from a properly configured machine for your environment


Backup and Restore

With today’s use of e-mail you almost can’t afford to lose a single e-mail so let alone your entire mail archive. This guide is all about backing up and restoring your Outlook Data. It describes various methods and explains which method is best to be used in which scenarios. Continue reading: Backup and Restore