
If you are sending the same e-mails on a recurring basis like daily, weekly, monthly etc… to send for instance a reminder or an update report as attachment you may want to automate that. Outlook doesn’t natively have this feature but with some code or add-in it can be done. Continue reading: Schedule a Recurring E-mail

Use "BH93RF24" to get a discount when ordering!
Setting Outlook Group Policies
When you are in an Active Directory network environment, you can set Outlook policies to enforce settings on a specific or a group of users or computers. This is mainly to be used to change or limit the default behavior of Outlook in a corporate environment but can also be useful in some home environments. For instance, as a home user you might want to set policies on what your children can and cannot do in Outlook.
This article explains how you can set Group Policies for Outlook and which tools are needed for it. Continue reading: Setting Outlook Group Policies
Setting Permissions on a Mailbox
Setting the correct permissions on mailboxes and Outlook folders can be done in several ways when you are in an Exchange organization. The correct way for you depends on your needs. While some methods look quite the same the results can be very different. This guide explains in which way you can set permissions and what their results are.
Basically there are three ways of setting permissions;
Via Exchange
This is where it starts. To be able to set permissions you must have them yourself. When your administrator creates your account he/she will also create a mailbox with you as the owner of the mailbox giving you automatically full permissions. This enables you to create an Outlook mail profile so you can start Outlook with your mailbox as the Outlook Today folder and allows you to set permissions for others.
Exclusive permissions for this method;
- Setting an owner for the mailbox so a mail profile with your mailbox as the Outlook Today mailbox. (full mailbox Exchange permissions required)
- Set Send As Owner permissions (Send As mailbox permissions are required)
- Set Send On Behalf Of Owner permissions. This can be controlled from within Outlook as well so your administrator doesn’t really have to be disturbed for this one.
Via the Permissions tab in Options
This is where you can set permissions on the mailbox shown as the Outlook Today mailbox. In Outlook choose Tools-> Options-> tab Delegates and the following screen will show;
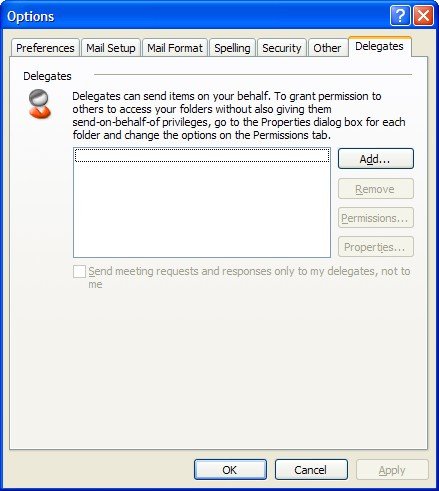
From within this interface you can add people from within your organization to the delegates list and set appropriate permissions for them on the following folders; Calendar, Tasks, Inbox, Contacts, Notes and Journal. Setting permissions this way is probably the easiest and fastest. It also allows you to set some permissions which can’t be set by any other way.
The following permissions can be set on the folders;
| Permission | Effective setting |
| None | None |
| Reviewer | Can read items |
| Author | Can read and create items |
| Editor | Can read, create and modify items |
Note that you are only setting permissions on the folders that are listed and on not their subfolders.
Once these permissions have been set the delegate can open the folders they’ve got permissions to by File-> Open-> Other User’s Folder…
Exclusive permissions for this method;
- All delegates will have Send On Behalf Of Permissions (also possible by Exchange permissions but since you can control it yourself it’s not needed to bother your administrator about it)
- On the Delegates tab you can set the option that copies of invitations for meetings are also send to the delegate. This is handy when you have someone planning your appointments.
- In the Delegates Permissions window you can set the option that the delegate can also see messages marked as private.
Via the Permissions tab on the folder
This method gives you the best control on how others can access your folders. This also makes this method the most time consuming one.
Besides from the Permissions you can set shown in the table above you can also make adjustments to them by selecting or deselecting the available options.
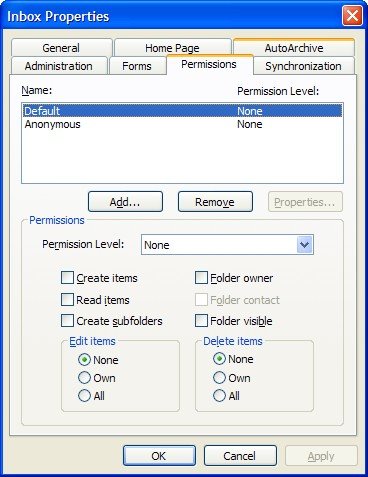
Be careful with setting permissions for Anonymous cause you’ll end up giving those permissions to everyone in your Exchange organization.
This method can be used so that people can add your mailbox to their Folder List and makes accessing your folders just as quick and easy as accessing your own. If you do this you must make sure that you have at least Folder Visible permissions on that folder and on the one above to make travelling to that folder possible. If you don’t do this you won’t be able to expand the folders. So if you want to add a subfolder of someone else’s mailbox to your Folder List you’ll need to set permissions not only on that subfolder but also on the Inbox folder and the Outlook Today folder.
Once the permissions have been set you can add the mailbox by Tools-> E-mail Account-> button Next-> select Exchange Service-> button Change-> button More Options …-> tab Advanced-> button Add.
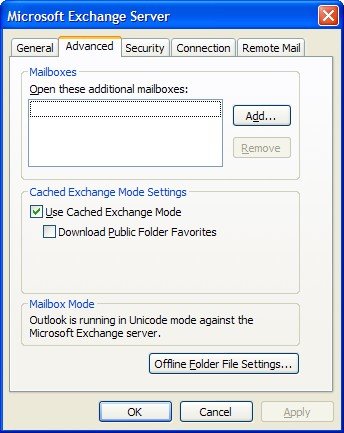
You can do this faster by right clicking Outlook Today-> Properties-> button Advanced-> tab Advanced-> button Add.
Exclusive permissions for this method;
- The only method that enables you to set per folder permissions
- Enables you to set permissions without giving the delegate Send On Behalf Of permissions
- Allows you to set more specific permissions.
Open Message in Internet Browser
Outlook 2007 uses Word as the HTML rendering engine which could end up in a malformed display of the email message. In short; The Word HTML rendering engine doesn't provide support for things like gif and flash animations, advanced css formatting and HTML forms and accessibility.
This guide explains how you can render the message in a browser of your choice like Internet Explorer or Firefox by a click of a button. For more information on the Word HTML rendering engine and its implications click here. An additional benefit of opening the message in the browser is that you have the printing options of the browser available to you and therefore also the option to only print your selection. Continue reading: Open Message in Internet Browser
Navigation Pane Tips & Tricks
Toggle the Navigation Pane
With ALT+F1 you can enable/disable the Navigation Pane
Easily switch between the various Navigation Panes;
- CTRL+1 Mail Navigation
- CTRL+2 Calendar Navigation
- CTRL+3 Contacts Navigation
- CTRL+4 Tasks Navigation
- CTRL+5 Notes Navigation
- CTRL+6 Folder List Navigation
- CTRL+7 Shortcuts Navigation
- CTRL+8 Journal Navigation
Add Shortcuts to the Shortcuts Navigation
You can build your own custom menu in the Shortcuts Navigation. It can consist of anything like shortcuts to Outlook folders, Explorer Folder, files and applications and can be organized in expandable/collapsible groups.
- For an Outlook folder; click Add new Shortcut
- For an Explorer folder or file; drag & drop the folder or file on the group name from an Explorer window
Change the startup folder
You can configure the startup folder by going to Tools-> Options-> tab Other-> button Advanced E-mail Options… You can even choose a Search Folder.
Start in E-mail, Folder List or Shortcuts Navigation
Close Outlook in the Navigation you prefer and it will start in that Navigation again. For the Shortcuts Navigation make sure your configured startup folder is available in the Shortcuts Navigation.
Add an Exchange Mailbox (when connected to an Exchange server of course)
Right click the root of your Exchange Mailbox-> Properties-> button Advanced…-> tab Advanced
Add Favorite Folders
You can add mail and search folders to your Favorite Folders lists in the Mail Navigation by right clicking a folder and choose Add to Favorite Folders or drag & drop the folder into the Favorite Folders box. To remove a folder right click the folder in either the Favorite Folders box or in the folder list and choose Remove From Favorite Folders…
Note: The Favorite Folders box cannot be removed not even when you remove all shortcuts from the pane.
Reset the Navigation Pane
To reset the Navigation Pane and to undo all customizations start Outlook by (check your path to outlook.exe);
Start-> Run; "C:\Program Files\Office 11\Outlook.exe" /resetnavpane
Location of the Navigation Pane settings
Navigation Pane settings are stored here;
C:\Documents and Settings\%username%\Application Data\Microsoft\Outlook\<profilename>.xml
You can backup and restore this file if you want to when Outlook is closed.
Add additional Calendar, Contacts, Tasks, Notes and Journal folders to the Navigation Pane
- All Calendar, Contacts, Tasks, Notes and Journal folders that are available in the Folder List Navigation (with exception of the Public Folders) will be shown in the My … box in the corresponding Navigation Pane.
- All other folders that you have accessed through File-> Open-> Other User’s Folder… will be shown in the Other … box in the corresponding Navigation
- To add a Calendar, Contacts, Tasks, Notes or Journal Public Folder to the corresponding Navigation right click that folder and choose Add to Favorites… If it still doesn’t show; right click the folder from within Favorites and choose Add to Other …
Show Multiple Calendars
To show multiple calendars side-by-side you can select the Calendars in the Calendar Navigation. The name of the Calendar will show above the view of the calendar and calendars will be marked with different colors.
Show Views to the Navigation Pane
View-> Arrange By-> Show Views in Navigation Pane
View Monthly Calendars in the Calendar Navigation
When you disable the TaskPad (View-> TaskPad) when in the Calendar Navigation the monthly calendars will show up in the Navigation Pane instead of above the TaskPad.
Update general info for multiple contacts
Creating contacts is easy and before you know it you’ve got several dozen, hundreds of them in your Contacts folder. It is very likely that some of them have relations with one another like the same company. If you want to store company info with the contacts you just don’t want to open every contact and add the same information to it. Even worse; do you want to change the address for every contact when the company relocates? I know I wouldn’t!
The following method describes an easy way to update general information for contacts that are linked with one another in some way.
To start we simply update the information for one contact (in this case the Business Address) and then Save and Close that contact. Then we modify the view of the Contacts folder so that the all the contacts are grouped by that updated field. So for our example of the Business Address that would be;
- View-> Arrange By-> Custom…*
- In the Customize View window press Group By…
- At the bottom set the “Select available fields from:” to “Address fields”
- At the top you can now set the “Group items by” to “Business Address” field
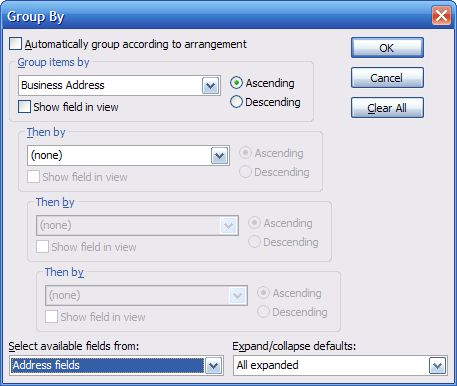
- OK your way out of the open dialog boxes
*Instead of modifying the view you can also define a special Business Address view. Step one then gets replaced by
- View-> Arrange By-> Current View-> Define Views…-> New
- Name it Business Address -> OK
Now you’ll see that all your contacts are grouped by the Business Address. Select the contacts who still have the old address and drag & drop them into the group of your updated contact. Outlook will automatically update the Business Address field for all those contacts.
Creating a permanent New Mail Desktop Alert
I thought it was one of the most excessive* options in previous versions of Outlook and I was happy to see it got a huge functional and cosmetic overhaul in Outlook 2003. Strangely enough it soon became one of the most criticized options as well; the New Mail Desktop Alert.

Old New Mail Alert Outlook 2002 and previous

New Mail Desktop Alert for Outlook 2003, Outlook 2007 and Outlook 2010.
Fortunately the criticism is mainly based on only 2 things;
- "It only works on the Inbox folder"
- "It cannot be configured to stay longer than 30 seconds; I WANT IT TO STAY PERMANENT!"
Yes, I said "fortunately" as both issues can be solved. On top of that; there is another way to notify yourself of newly received e-mails while you were not attending Outlook;
"It only works on the Inbox folder"
By default the new New Mail Desktop Alert will only show when the mail is delivered to the Inbox. This means that when you have a rule configured to move your mail to a different folder the Notification won't show.
To workaround this you can add the action "display a Desktop Alert" to each and every rule. Besides the fact that it is very tiresome, the real downside of this is that when you are in an Exchange organization the rule will become a local rule so that it will only execute when Outlook is running. This means that when you have added extra actions to the rule, like forwarding it to another address, those actions won't be executed either.
A better solution is to create a generic rule with no conditions and just the action to display the Desktop Alert.
- Open the Rules and Alerts dialog;
- Outlook 2003 an Outlook 2007
Tools-> Rules and Alerts… (press OK if you get an HTTP warning) - Outlook 2010
tab Home-> group Move-> button Rules-> Manage Rules & Alerts…
- Outlook 2003 an Outlook 2007
- Button New Rule…
- Select "Start from a blank rule" and verify that "Check messages when they arrive" is selected.
- Press Next to go to the Conditions screen.
- Verify that no condition is selected and press Next.
- A warning will pop-up stating that this rule will apply to all messages. Press "Yes" to indicate that that is correct.
- Select the action "display a Desktop Alert".
- Press Finish to complete the rule.
- If needed move the "display a Desktop Alert" rule all the way to the top.
")
You can create a rule to show the New Mail Desktop Alert for each message that you receive. (click on image to enlarge)
"It cannot be configured to stay longer than 30 seconds; I WANT IT TO STAY PERMANENT!"
Well permanent isn't possible but how does 50 days sound? Through the registry you can set the New Mail Desktop Alert as long as 4,294,967,295 milliseconds ≈ 50 days.
Just a little math first to clarify the working of the registry key;
- The value is defined in milliseconds.
- When the registry key is set to 0 the New Mail Alert still shows for 3 seconds so this is hard coded in the program thus 3,000 milliseconds.
- 4,294,967,295 is the maximum value you can give to a DWORD value in the registry, which is 32 bit.
- As the object that controls the time of the New Mail Desktop Alert is also defined as a DWORD and is 3000 already we cannot give the TimeOn registry key a higher value than;
4,294,967,295 – 3000 = 4,294,964,295 - To convert from milliseconds to days, we must divide the milliseconds through; 1000 to convert to seconds, then 60 to convert to minutes, then 60 to convert to hours, then 24 to convert to days
(4,294,967,295 – 3,000) / (1000 * 60 * 60 *24) ≈ 50
After all this math it's time to tell the registry key (to open the registry go to Start-> Run and type "regedit");
- Outlook 2003
HKEY_CURRENT_USER\Software\Microsoft\Office\11.0\Common\DesktopAlerts\TimeOn - Outlook 2007
HKEY_CURRENT_USER\Software\Microsoft\Office\12.0\Common\DesktopAlerts\TimeOn - Outlook 2010
HKEY_CURRENT_USER\Software\Microsoft\Office\14.0\Common\DesktopAlerts\TimeOn
If this key isn't available choose Edit-> New-> DWORD Value and name it TimeOn(case sensitive!).
Double click the key to give it a decimal value between 0 and 4294964295 (in Hexadecimal value this will be fffff448).

Setting the maximum decimal value in the registry
Enjoy your permanent New Mail Desktop Alert that shows for each mail that you receive! ![]()
Tip!
To easily set the New Mail Alert without going into the registry you can use OutlookTools (free!)
View a list of newly received e-mails
The New Mail Desktop Alert only shows for the last e-mail received so when you've received multiple new e-mails across folders it still might be a bit hard to immediately locate them. This has actually always been the case with any version of Outlook. Outlook 2003 has a new action rule for this; display a specific message in the New Item Alert window.
As an example we are again going to create a generic rule with no conditions and just the action to display the New Item Alert window. You can of course set conditions and exceptions as desired and note that, since Outlook 2003 SP1, rules get executed after Junk E-mail filtering so the New Item Alert window won't get polluted with Junk E-mail.
- Tools-> Wizards and Alerts… (press OK if you get an HTTP warning)
- Button New Rule…
- Select "Start from a blank rule" and verify that "Check messages when they arrive" is selected
- Press Next to go to the Conditions screen
- Verify that no condition is selected and press Next
- A warning will pop-up stating that this rule will apply to all messages. Press "Yes" to indicate that that is correct
- Select the action "display a specific message in the New Item Alert window"
- Type your specific message (this is handy if you create more than one rule that displays the New Item Alert window so that you can easily distinguish between them)
- Press Finish to complete the rule
- If needed move the "display a Desktop Alert" rule all the way to the top

Get your newly received e-mails in a handy overview
*In case you were wondering why I found it an excessive option in previous versions of Outlook; it didn't add anything to the other permanent notification; the envelope in the Notification Area
What Do The Icons Mean?
Outlook holds a lot of icons to indicate different item types and other item properties. Below you'll find a long list of these icons and their meaning.
| Unread Message | |
| Unread Signed Message | |
| Unread Encrypted Message | |
| Read Message | |
| Read Signed Message | |
| Read Encrypted Message | |
| Draft | |
| Sending Message | |
| Forwarded Message | |
| Forwarded Signed Message | |
| Forwarded Encrypted Message | |
| Replied on Message | |
| Replied on Signed Message | |
| Replied on Encrypted Message | |
| Out Of Office Message | |
| Message Recall Request | |
| Message Recall Failure Report | |
| Message Recall Successful Report | |
| Multimedia Message (can I get a repro?) | |
| Delivery Report | |
| Non Delivery Report | |
| Message Deleted Without Being Read Notice | |
| Message Read Notice | |
| Secure Receipt | |
| Post | |
| Replied on Post | |
| Message Holds (Receipts) Tracking Tab (Outlook 2003 and previous) | |
| Message Holds (Receipts) Tracking Tab (Outlook 2007 and Outlook 2010) |
Meeting Messages
| Meeting Request | |
| Accepted Meeting Request | |
| Cancelled Meeting Request | |
| Can I get a repro? | |
| Declined Meeting Request | |
| Tentative Meeting Request |
Calendar (with some help from the Office Site)
| Recurring Item | |
| Exception to Recurring Item | |
| Data Conflict | |
| Start Time of an Appointment or Meeting | |
| End Time of an Appointment or Meeting | |
| All Day Event | |
| Scheduled Meeting | |
| Private Item | |
| A Reminder is Associated with this Item | |
| A Meeting Workspace is Associated with this Item | |
| A File Attachment is Associated with this Item | |
| More Items |
Contacts
| Contact | |
| Contact with Journaling enabled | |
| Distributionlist |
Tasks
| Task | |
| Delegated Task | |
| Received Task | |
| Recurring Task | |
| Accepted Task | |
| Declined Task | |
| Task Request |
Journal
For an overview of journal items click here.
General
| High Importance | |
| Low Importance | |
| Attachment | |
| Unresolved | |
| 1 Off; something is screwed up | |
| Sticky Note |
Security (icon shown in Message)
| Invalid Signature | |
| Encrypted | |
| Valid Signature | |
| Unknown Signature | |
| Signature Warning |
Flags (Outlook 2003)
| No Follow Up Flag | |
| Red Follow Up Flag | |
| Blue Follow Up Flag | |
| Yellow Follow Up Flag | |
| Green Follow Up Flag | |
| Orange Follow Up Flag | |
| Purple Follow Up Flag | |
| Follow Up Completed |
Non-Native (added via custome forms or add-ins
| Appointment created via the Live Search Maps Add-In for Outlook | |
| Archived message via an Exchange level archiving solution | |
| Spam message indicated via a 3rd party anti-spam solution |
Export Contacts to Excel
Although the Import and Export wizard allows you to export to an Excel spreadsheet, the Wizard doesn’t allow you to export all the fields and filtering the mapped fields is a cumbersome process as well.
Fortunately there is another, more graphical (WYSIWYG), way to do this as well;
- Change your view to a table view like the “Phone List” view;
- Outlook 2010
Home tab-> group: Current View-> Phone - Outlook 2007
View-> Current View-> Phone List - Outlook 2003
View-> Arrange By-> Current View-> Phone List - Outlook 2002 and previous
View-> Current View-> Phone List
- Outlook 2010
- Insert and arrange the columns you want to export to Excel
- Outlook 2010
Tab View-> group: Arrangement-> button Add Columns - Outlook 2007
View-> Current View-> Customize Current View…-> button Fields… - Outlook 2003
View-> Arrange By-> Customize…-> button Fields… - Outlook 2002 and previous
View-> Current View-> Customize Current View…-> button Fields
Note that you can choose even more fields by using the dropdown list.
- Outlook 2010
- Press OK until all the open screens are closed.
- Choose Edit-> Select All or press CTRL+A to select al your contacts.
- Choose Edit-> Copy or press CTRL+C.
- Open up Excel and select cell A1.
- Choose Edit-> Paste or press CTRL+V to paste all contact information.
- Save your Excel sheet

Note: This is an export and not a backup. For info on backing up and restoring your Outlook contact and other data click here.
Edit the HTML Source Code while composing a Message
Editing the HTML source code has been made very easy in Outlook Express. In Microsoft Office Outlook… well, not so much and I doubt whether the tool available has actually been designed for this since the process is anything but intuitive.
- Make sure you’ve got Word selected as your e-mail editor; Tools-> Options-> tab Mail Format
- Create a new message and make sure the Web Tools Toolbar is visible; View-> Toolbars-> Web Tools
- Press the Microsoft Script Editor button. A new windows will pop-up displaying the HTML. Word uses a stylesheet so don’t be frightened by the immense amount of code in the header. Just scroll to the body part and edit the HTML
- When done close the script editor and choose to save it when prompted; a Save As dialog will pop-up
- Cancel this dialog
- Close the Script Editor and note that you don’t get prompted to save this time (unless you started editing again). You’ll find the HTML editing applied to your message

Use "4PM76A8" to get a discount when ordering!
